Ultrasonic Garage Door Notifier
Summary
If you’re like us, there will have been times you’ve left home and couldn’t remember if you shut the garage door. Wonder no more with this device, which emails you hourly, telling you whether it’s open or closed. It will also tell you if there’s a car parked in the garage or not. Since the emails come on the hour, you will know if the device is offline.
The Garage Door Notifier monitors the status of your car and garage (see Fig.1). It has an ultrasonic distance sensor that, with the correct placement, can detect a few different states.
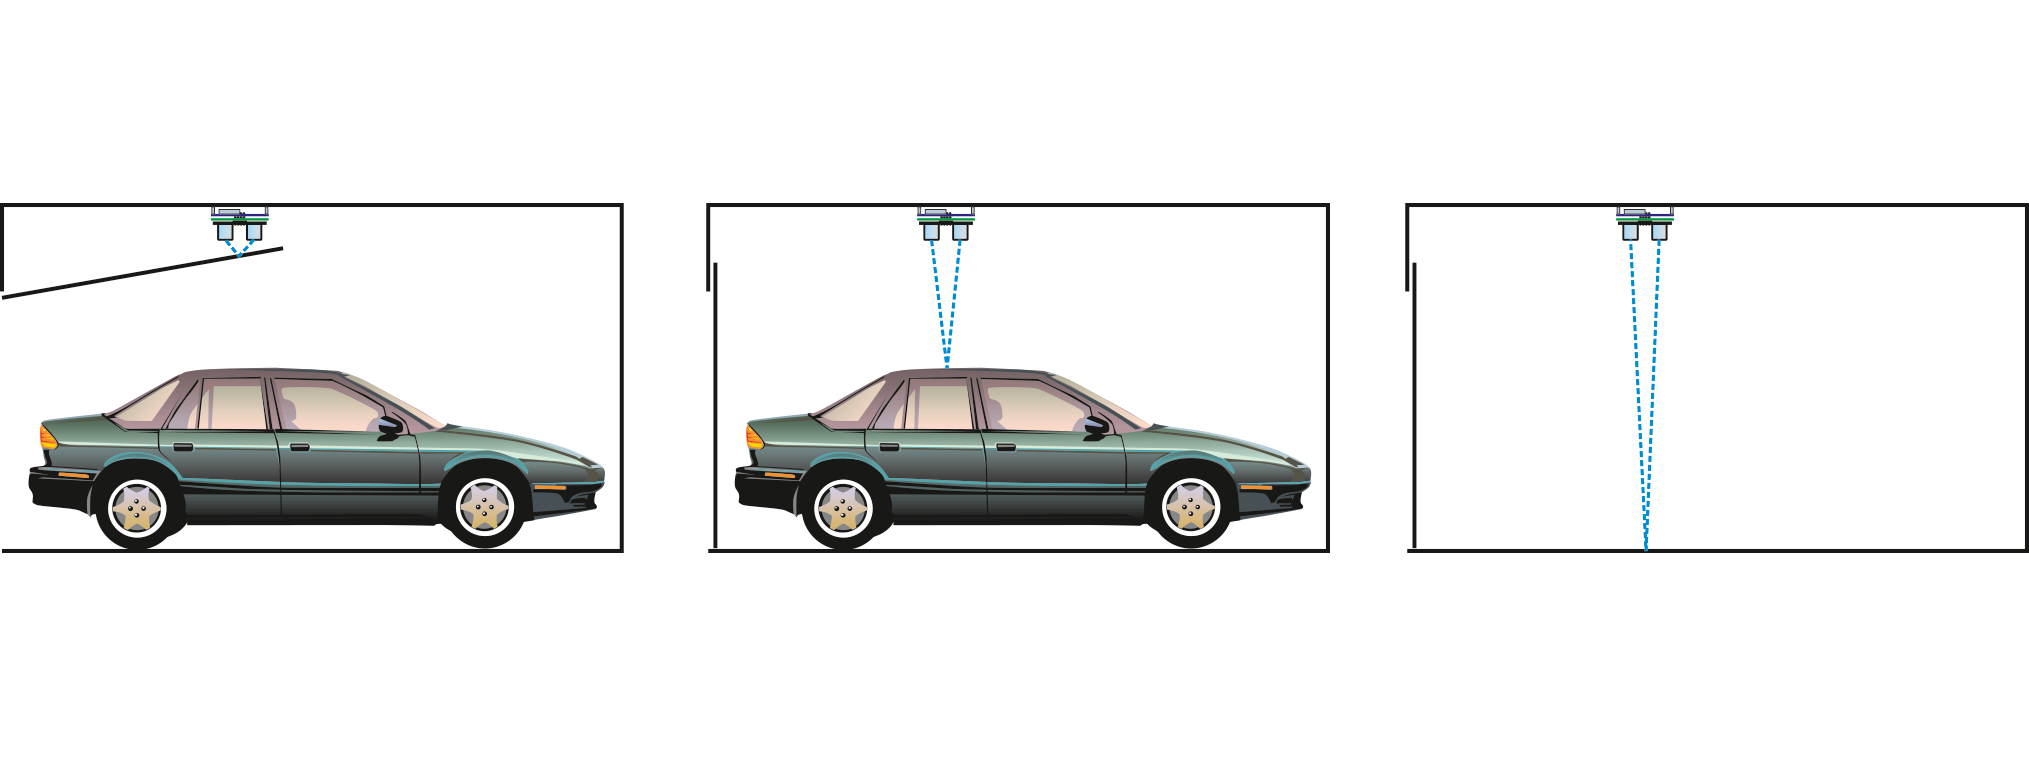
If the garage door is open, the sensor detects the door at a close distance. If the door is closed, the sensor can monitor the distance to whatever is in the garage. If a car is present, the distance it measures will be lower. It sends an email every hour, reporting its status.
We had that application in mind when designing this circuit, but we think our readers will come up with many other uses. For example, distance sensors can also measure the liquid level in a tank, so you could adapt it to monitor the amount of water in a rainwater tank.
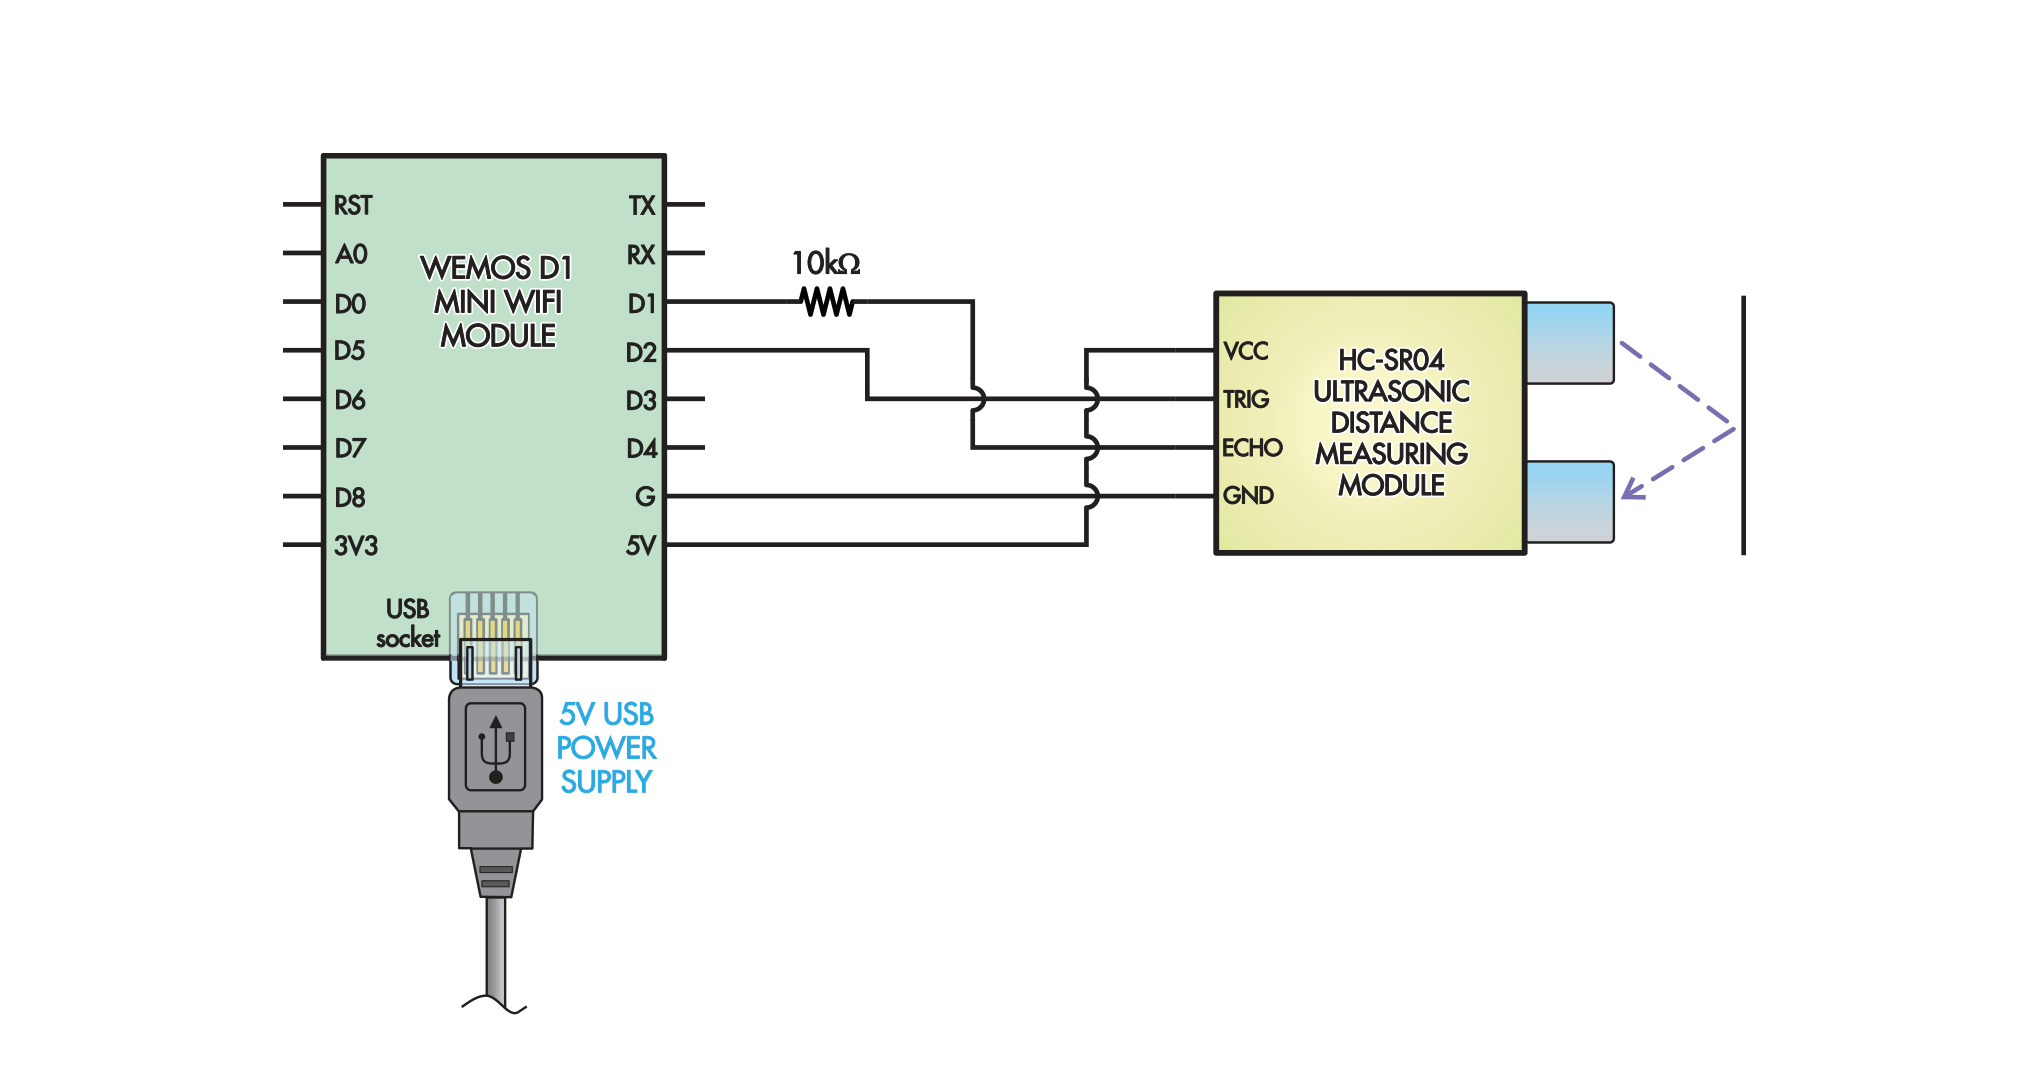
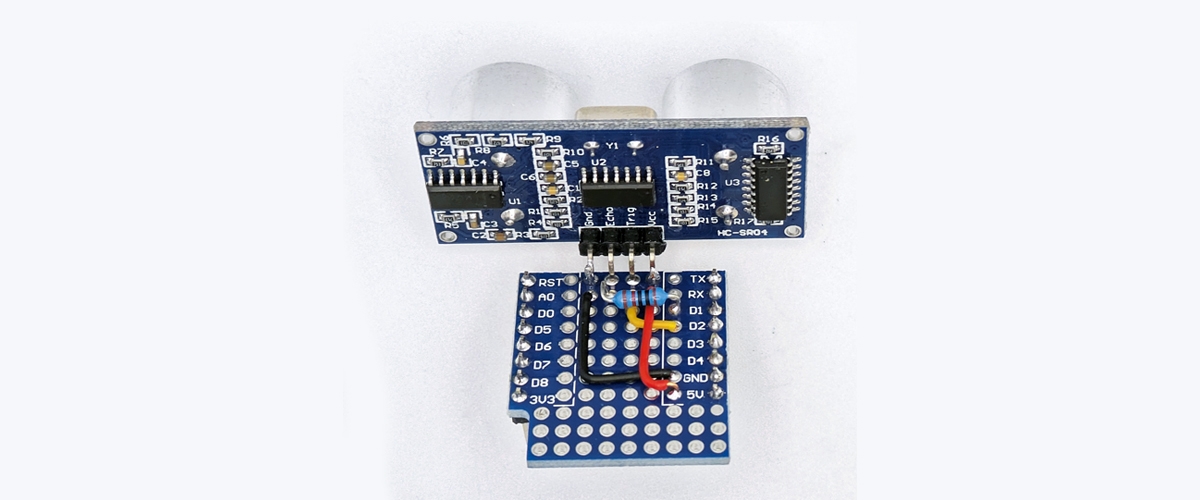
Fig.2 shows the circuit diagram of the Notifier. It’s basically just a WiFi Mini ESP8266 Main Board connected to an Ultrasonic Distance Sensor. The ESP8266 processor on the board connects to a WiFi network and uses NTP (network time protocol) to get the current time.
When it is due to report, on the hour, it activates the sensor to measure the distance. It then assembles a report and fires off an email. If you don’t see the email when it is due, you know something is amiss, like a power outage.
We previously covered the operation of the Ultrasonic Distance Sensor in the December 2016 issue of Silicon Chip (siliconchip.au/Article/10470) as part of our series on electronic modules. This sensor must be powered from 5V.
When a high pulse is sent to its TRIG pin, it emits a ping from one of its ultrasonic transducers, which reflects off a nearby surface. When the other ultrasonic transducer receives the reflected ping, the sensor produces a high pulse on the ECHO pin. The time between the pulses depends on the distance (and speed of sound); thus, the distance can be inferred from the delay.
The WiFi Mini (also known as the D1 Mini) is a small module integrating an ESP8266 processor with WiFi, plus a USB-serial converter. It’s one of the most compact WiFi boards that does not require any external parts to program.
We previously used these modules in Silicon Chip projects like the Clayton’s GPS Time Source from April 2018 (siliconchip.au/Article/11039) and the Smart Tariff Super Clock from July 2018 (siliconchip.au/Article/11137).
The ESP8266 processor has 3.3V I/O pins but the sensor must be powered from 5V. The TRIG pin on the sensor will respond to a 3.3V signal, so we can directly connect the ESP8266’s D2 digital output on the WiFi Mini to the TRIG pin on the sensor.
We have placed a 10kΩ resistor between the 5V ECHO output on the ultrasonic module and the D1 digital input pin on the WiFi Mini out of caution. There are widespread reports that the ESP8266’s I/O pins are tolerant of 5V, but the resistor is cheap insurance and limits the current into that input pin should it be clamped at 3.3V by an internal diode.
The software is written for the Arduino IDE and does not require any external files beyond those included with the ESP8266 board profile. The sketch connects to a WiFi network and uses NTP to get the time. If a WiFi network is connected and the time has been correctly set, the onboard LED lights.
The software checks the time, and when it detects that the hour has rolled over, it takes a measurement and uses the SMTP2GO service to send an email. The internal time is rechecked daily using NTP to avoid any drift that might occur long-term due to crystal tolerances.
The sketch is divided into several smaller helper functions, simplifying the main program loop. The Notifier sends a lot of debugging data to the serial port at 115,200 baud and can also be manually triggered (for testing) through that serial port.
We previously used the SMTP2GO service (https://www.smtp2go.com) for the WebMite-based Watering System Controller from Silicon Chip, August 2023 (siliconchip.au/Article/15899). SMTP2GO is an online service that makes sending emails easy from less-capable devices like microcontrollers.
SMTP stands for Simple Mail Transfer Protocol. It is the internet protocol that is used for sending email.
SMTP2GO has a free tier that allows 1000 emails per month; an email per hour works out at under 800 emails in a month, so that should be sufficient. There are paid tiers if you need to send more frequent emails.
To use SMTP2GO, you need to set up an account using an existing email address. We have heard that some ‘free’ email providers, such as Gmail, are not allowed, so we recommend checking if you can set up an account before starting your build.
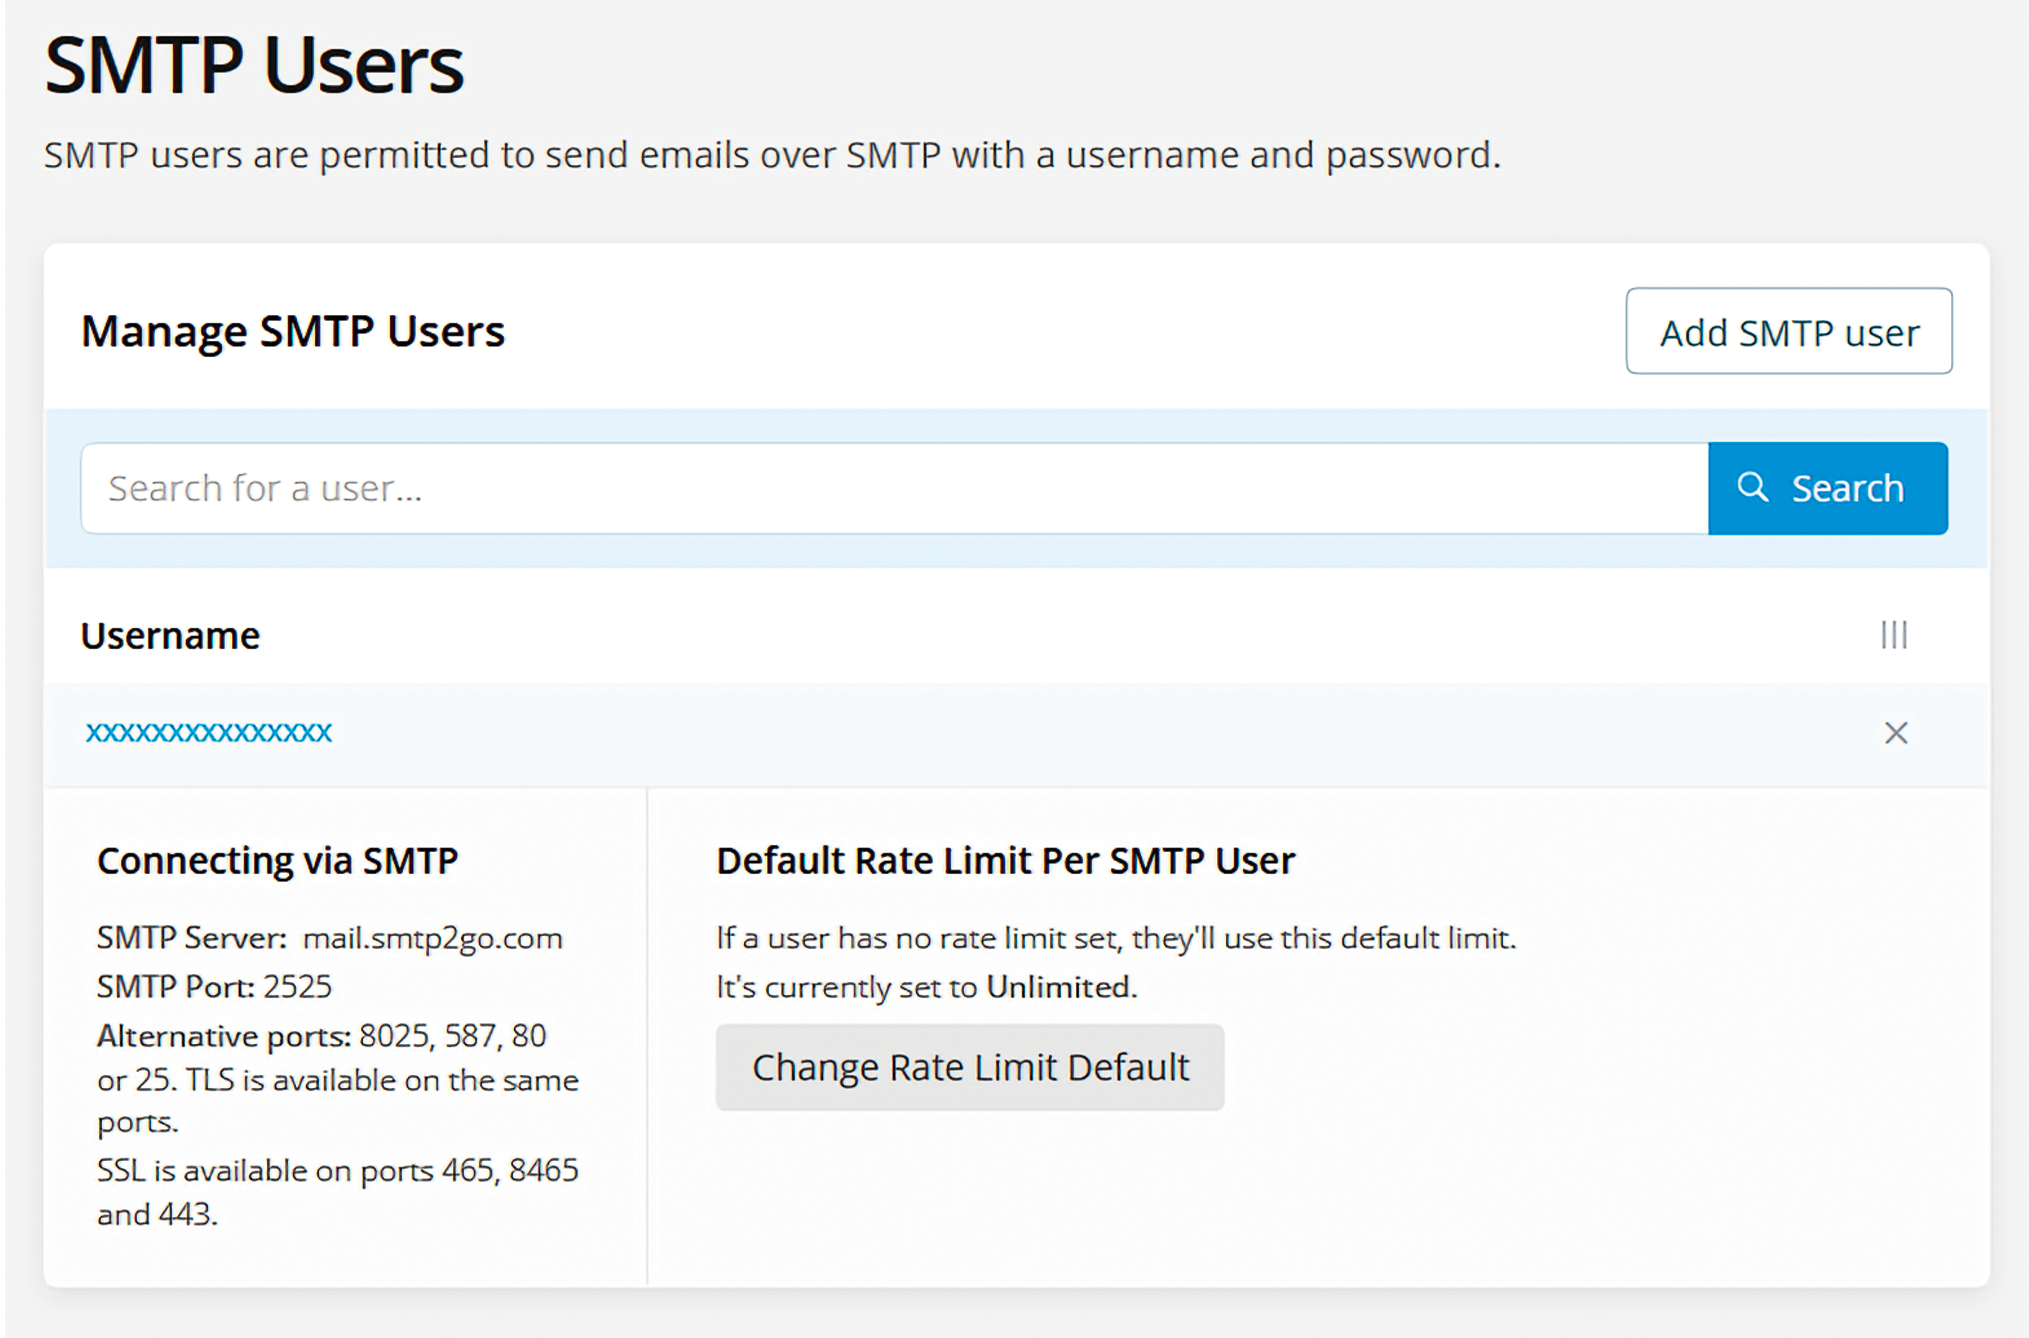
Once you have registered, you must set up an SMTP user (Dashboard → Sending → SMTP Users → Add SMTP User; see Screen 1). The SMTP username and password need to be placed in the sketch and authenticated as part of the sending process, so make sure to record them when you create the SMTP user.
The SMTP user account differs from the main SMTP2GO account; multiple SMTP users could be created under the same SMTP2GO account if you have multiple Notifiers.
You can test the SMTP2GO account using the WiFi Mini on its own. You will need to install the ESP8266 board profile into the Arduino IDE. If you don’t already have the IDE, it is a free download from www.arduino.cc/en/software/
To install the board profile, add https://arduino.esp8266.com/stable/package_esp8266com_index.json to the Addition Board Manager URLs field of the Arduino Preferences window.
The “ESP8266 by ESP8266 Community” board profile can then be installed from the Board Profiles window – we used version 3.1.2. Choose “WeMos D1 R2 and Mini” as the board type and select its serial port. Drivers can be downloaded from the Jaycar XC3802 product web page if needed.
Now download the sketch from siliconchip.au/Shop/6/428 and open it in the IDE. Six #defines near the start of the sketch must be customised. STASSID and STAPSK correspond to the WiFi network name and password; set them to correspond to your home network. SMTPUSER and SMTPPASS correspond to the SMTP user account you set up earlier. The SMTPFROM field must be the same as the email address used to set up the SMTP2GO account. The SMTPTO field is the intended recipient; we set this to be the same as the SMTPFROM field.
The default SMTPHOST and SMTPPORT values should work, but if you run into problems, check that they match those shown in Screen 1.
Now upload the sketch and open the Serial Port Monitor in the IDE at 115,200 baud. Within the first minute, you should see the first eight lines of Screen 2 appear, and the blue LED on the WiFi Mini should light up. If the WiFi network doesn’t connect, check that the STASSID and STAPSK values are correct.
Typing ‘~’ on the serial monitor will trigger an email, even if the sensor is not connected. If everything is working, you will see something like the remainder of Screen 2.
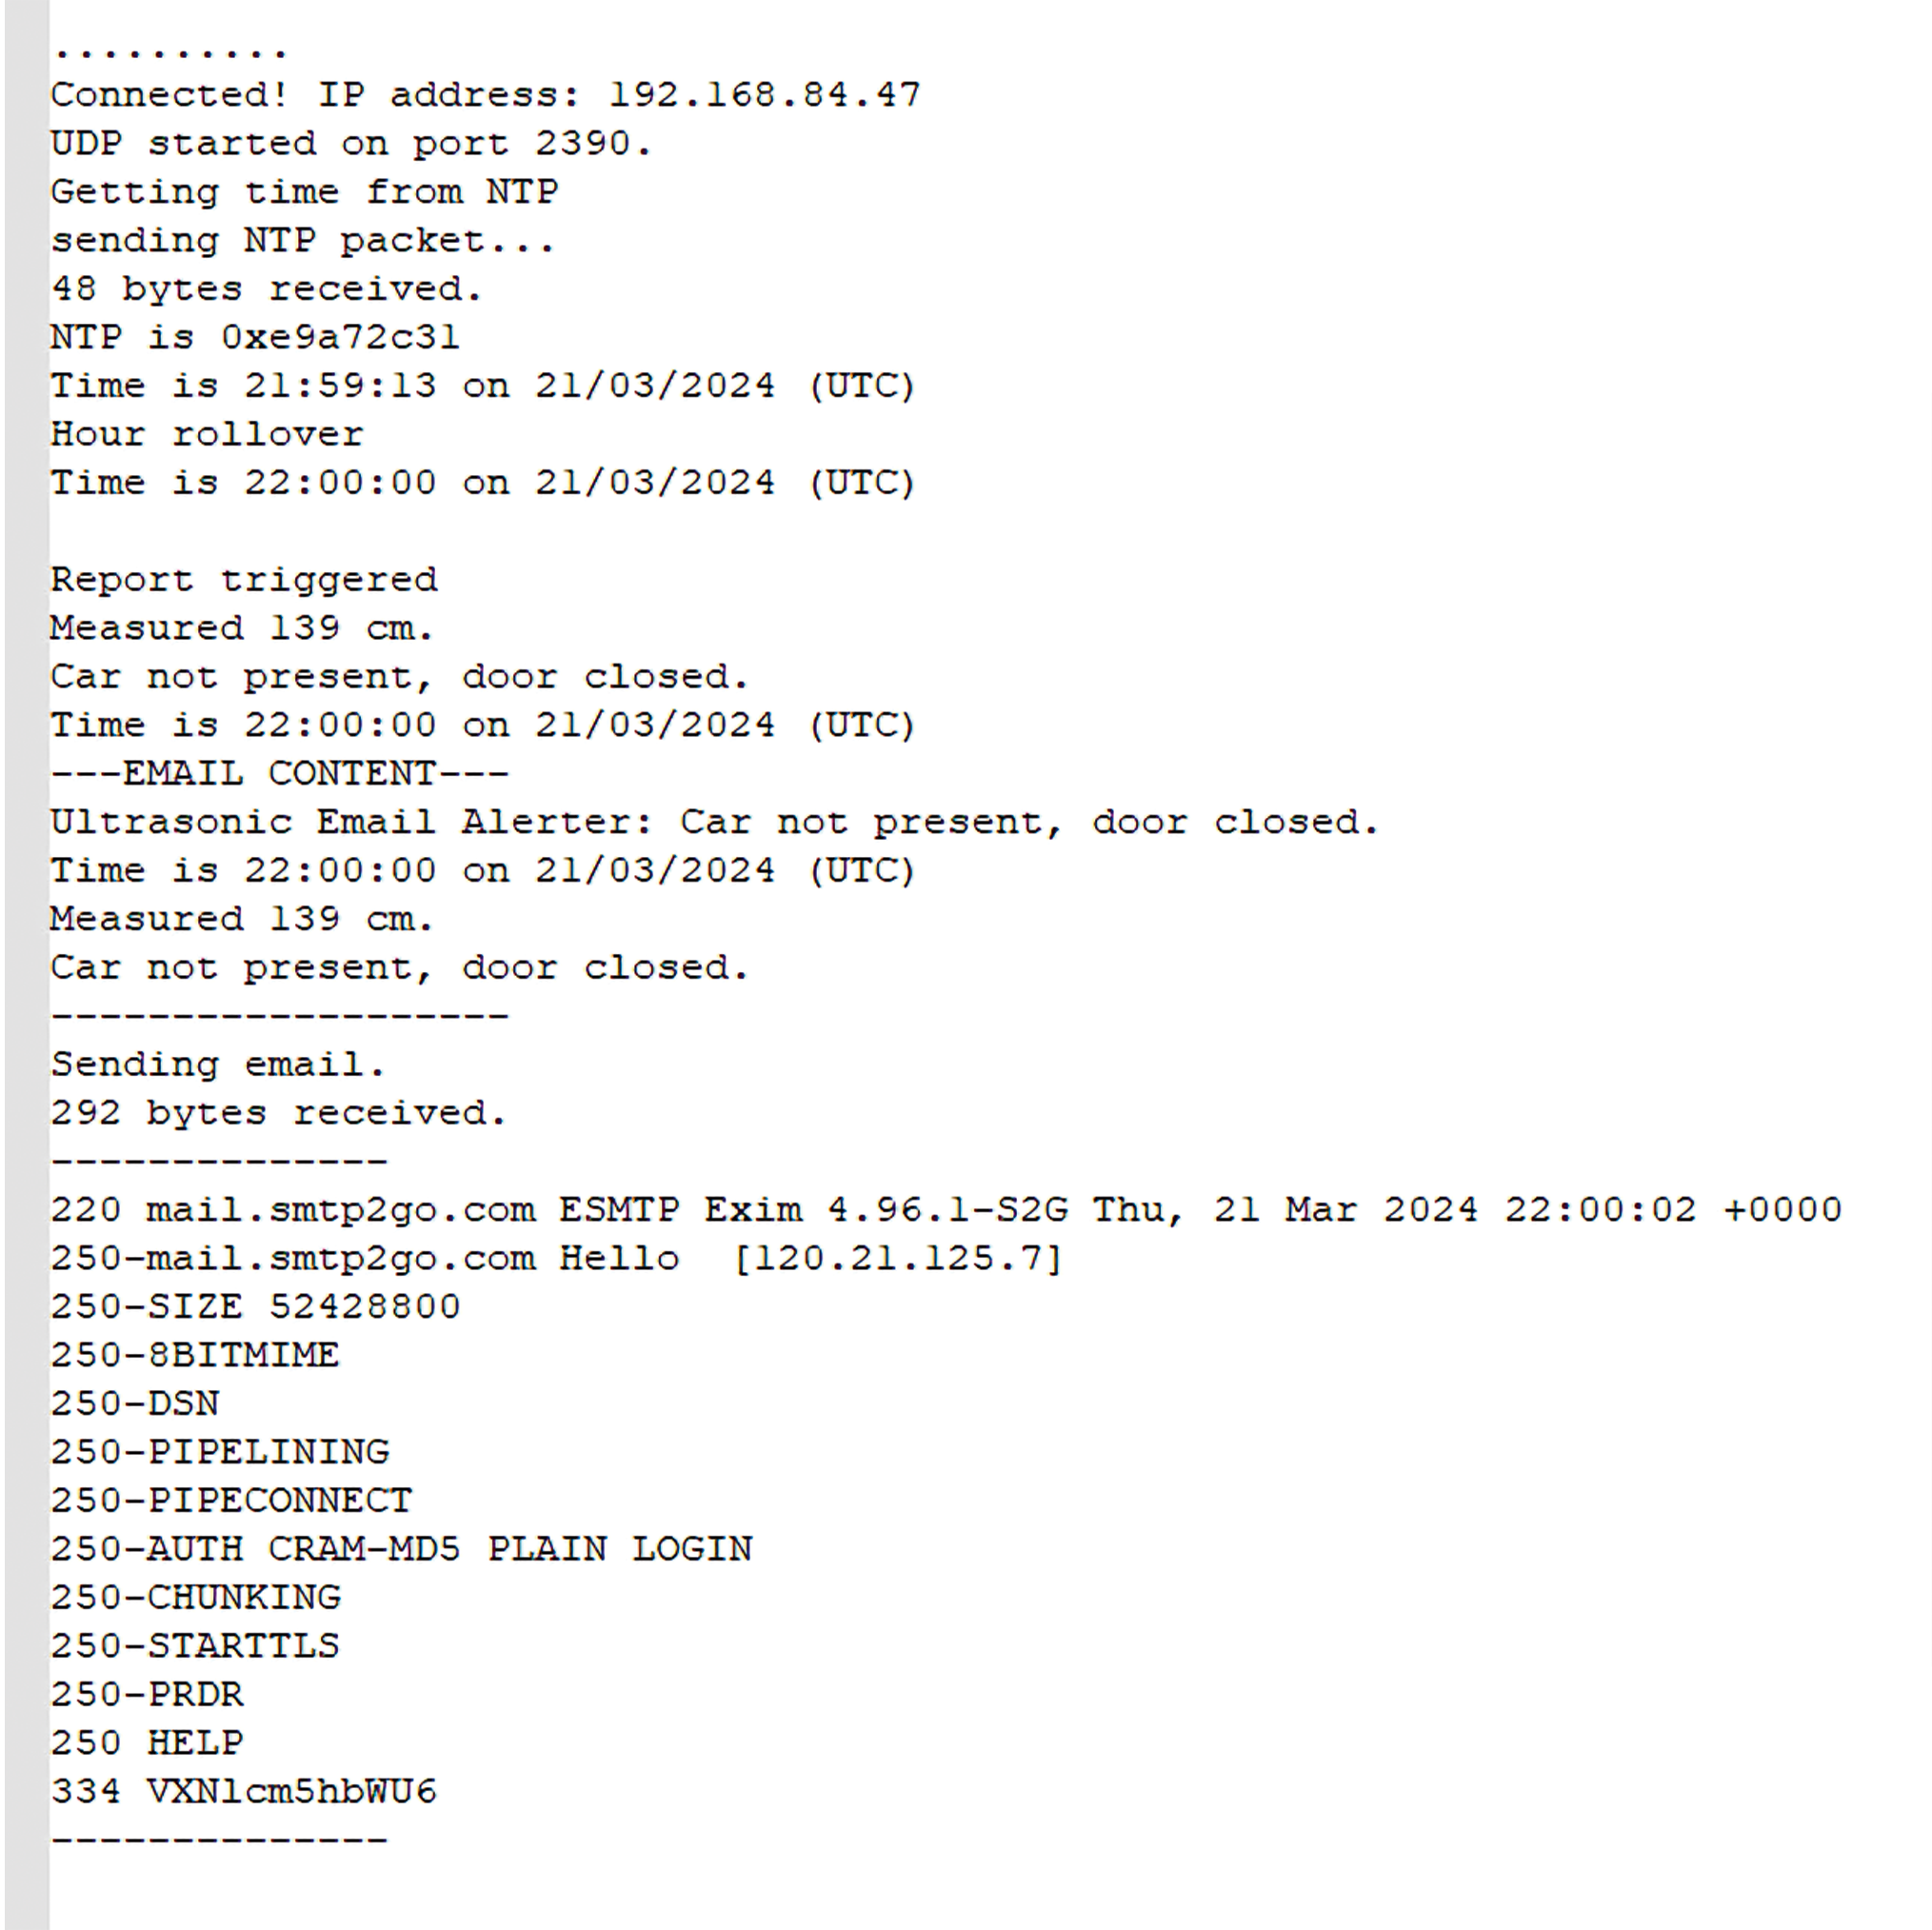
The three-digit codes are SMTP status codes. Those in the range 2xx and 3xx indicate that no error has occurred. A 4xx is likely a server error; you should retry. Codes in the 5xx range mean that there is a client (Notifier) problem with the SMTPUSER, SMTPPASS, or SMTPFROM fields. Check and edit these, then upload the sketch again.
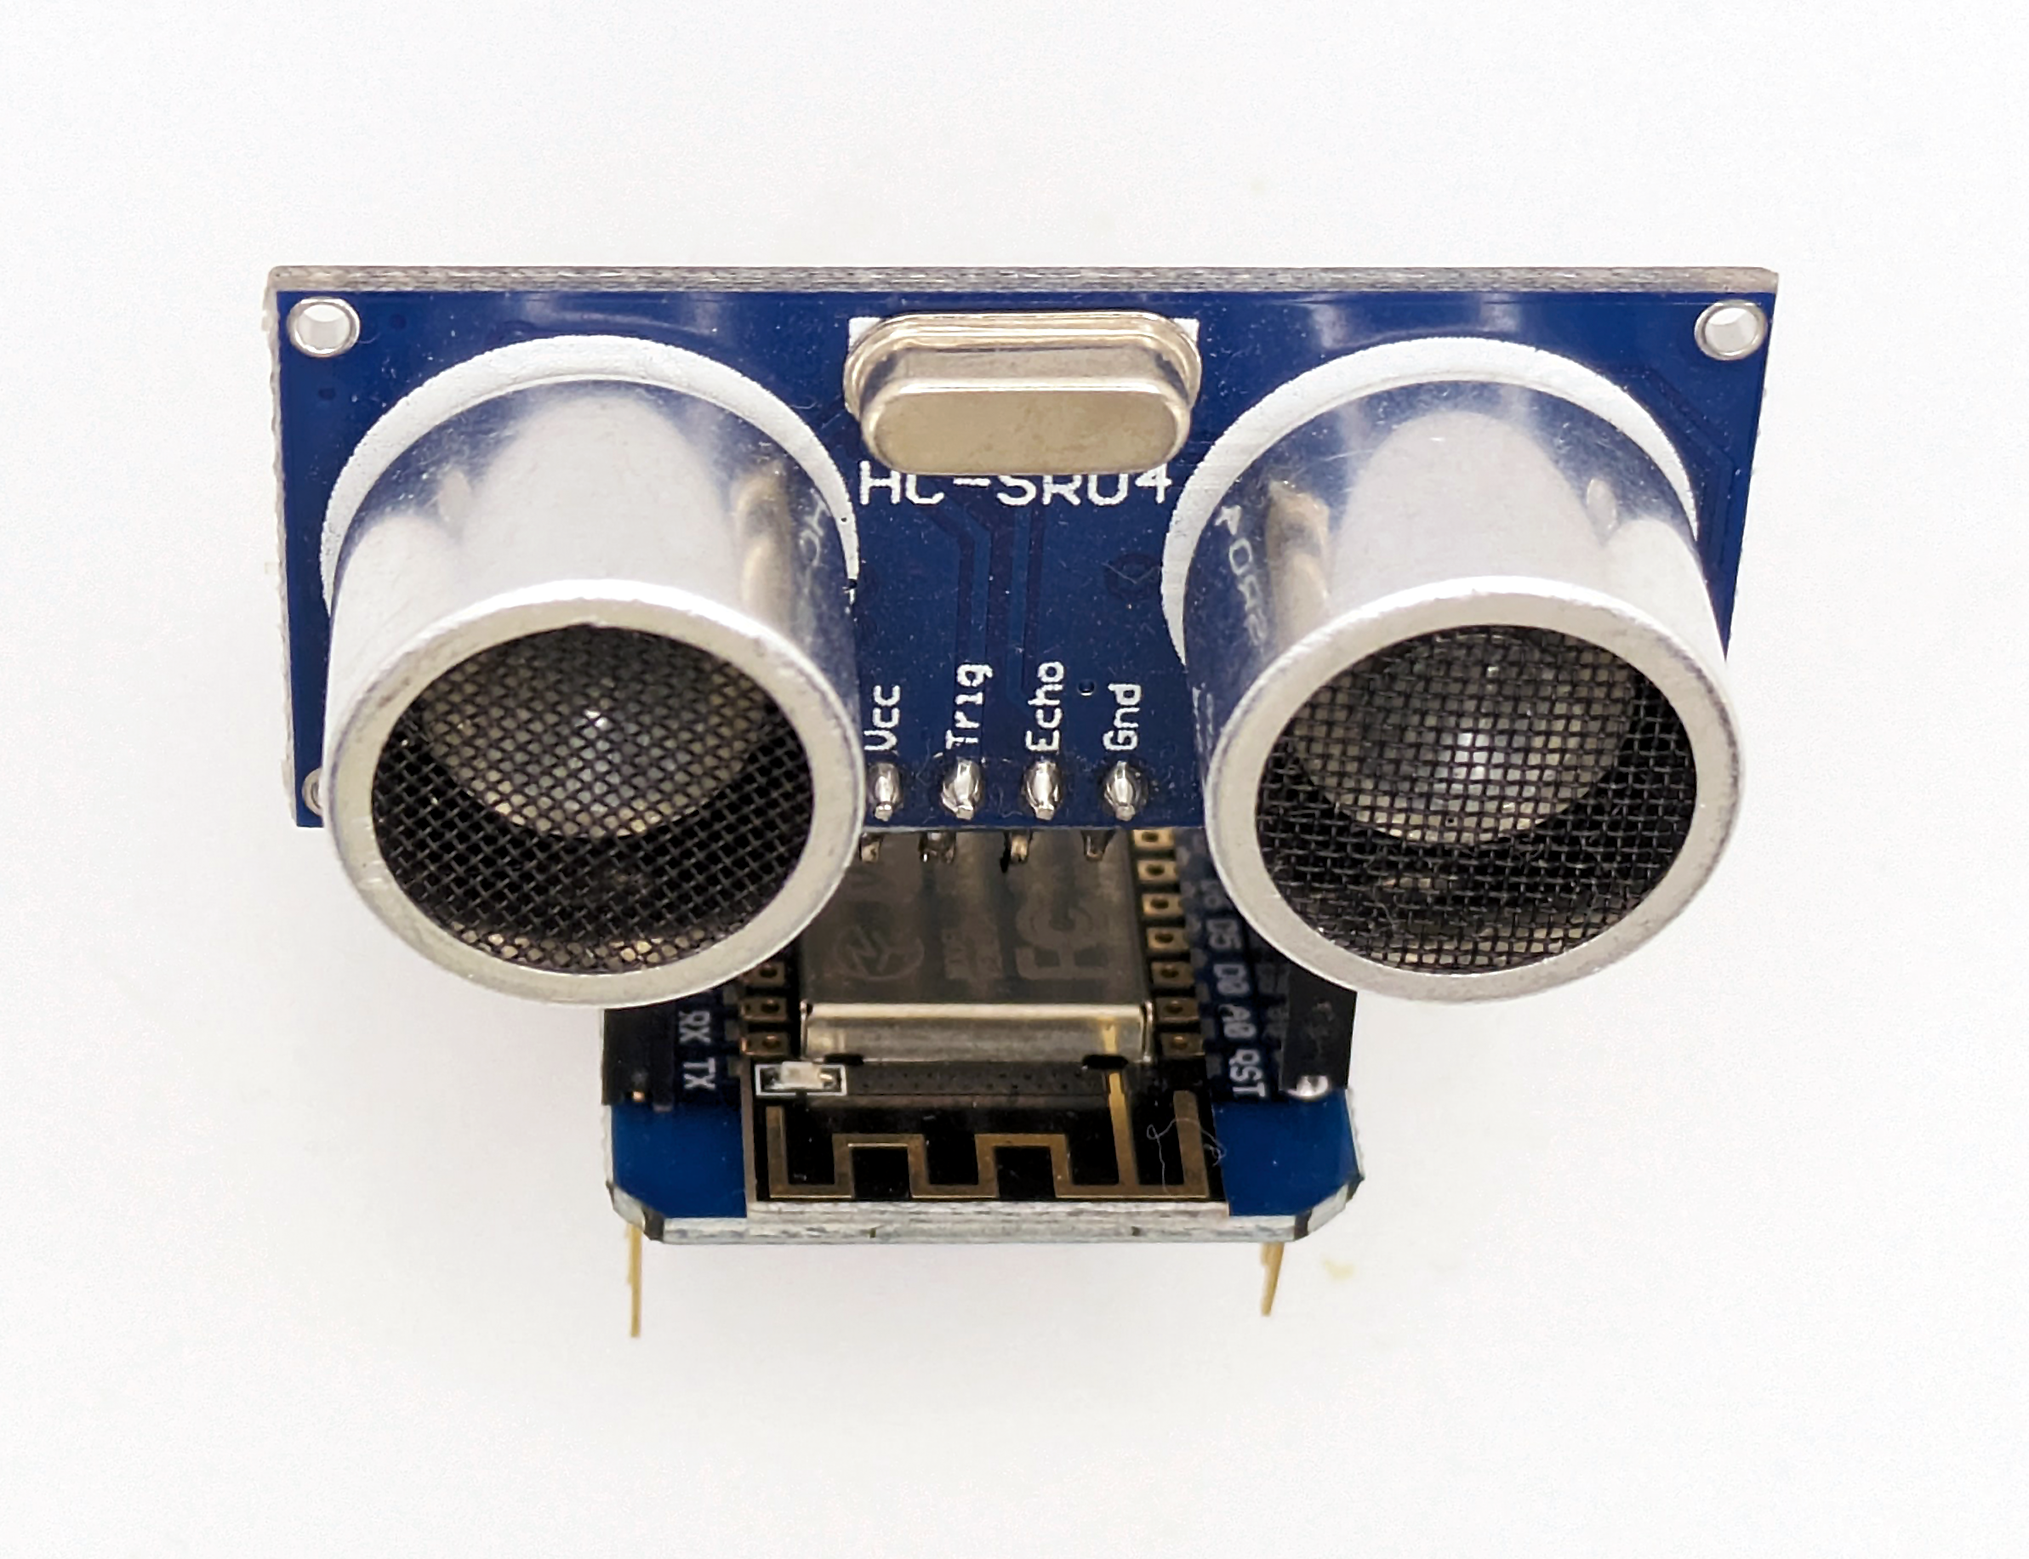
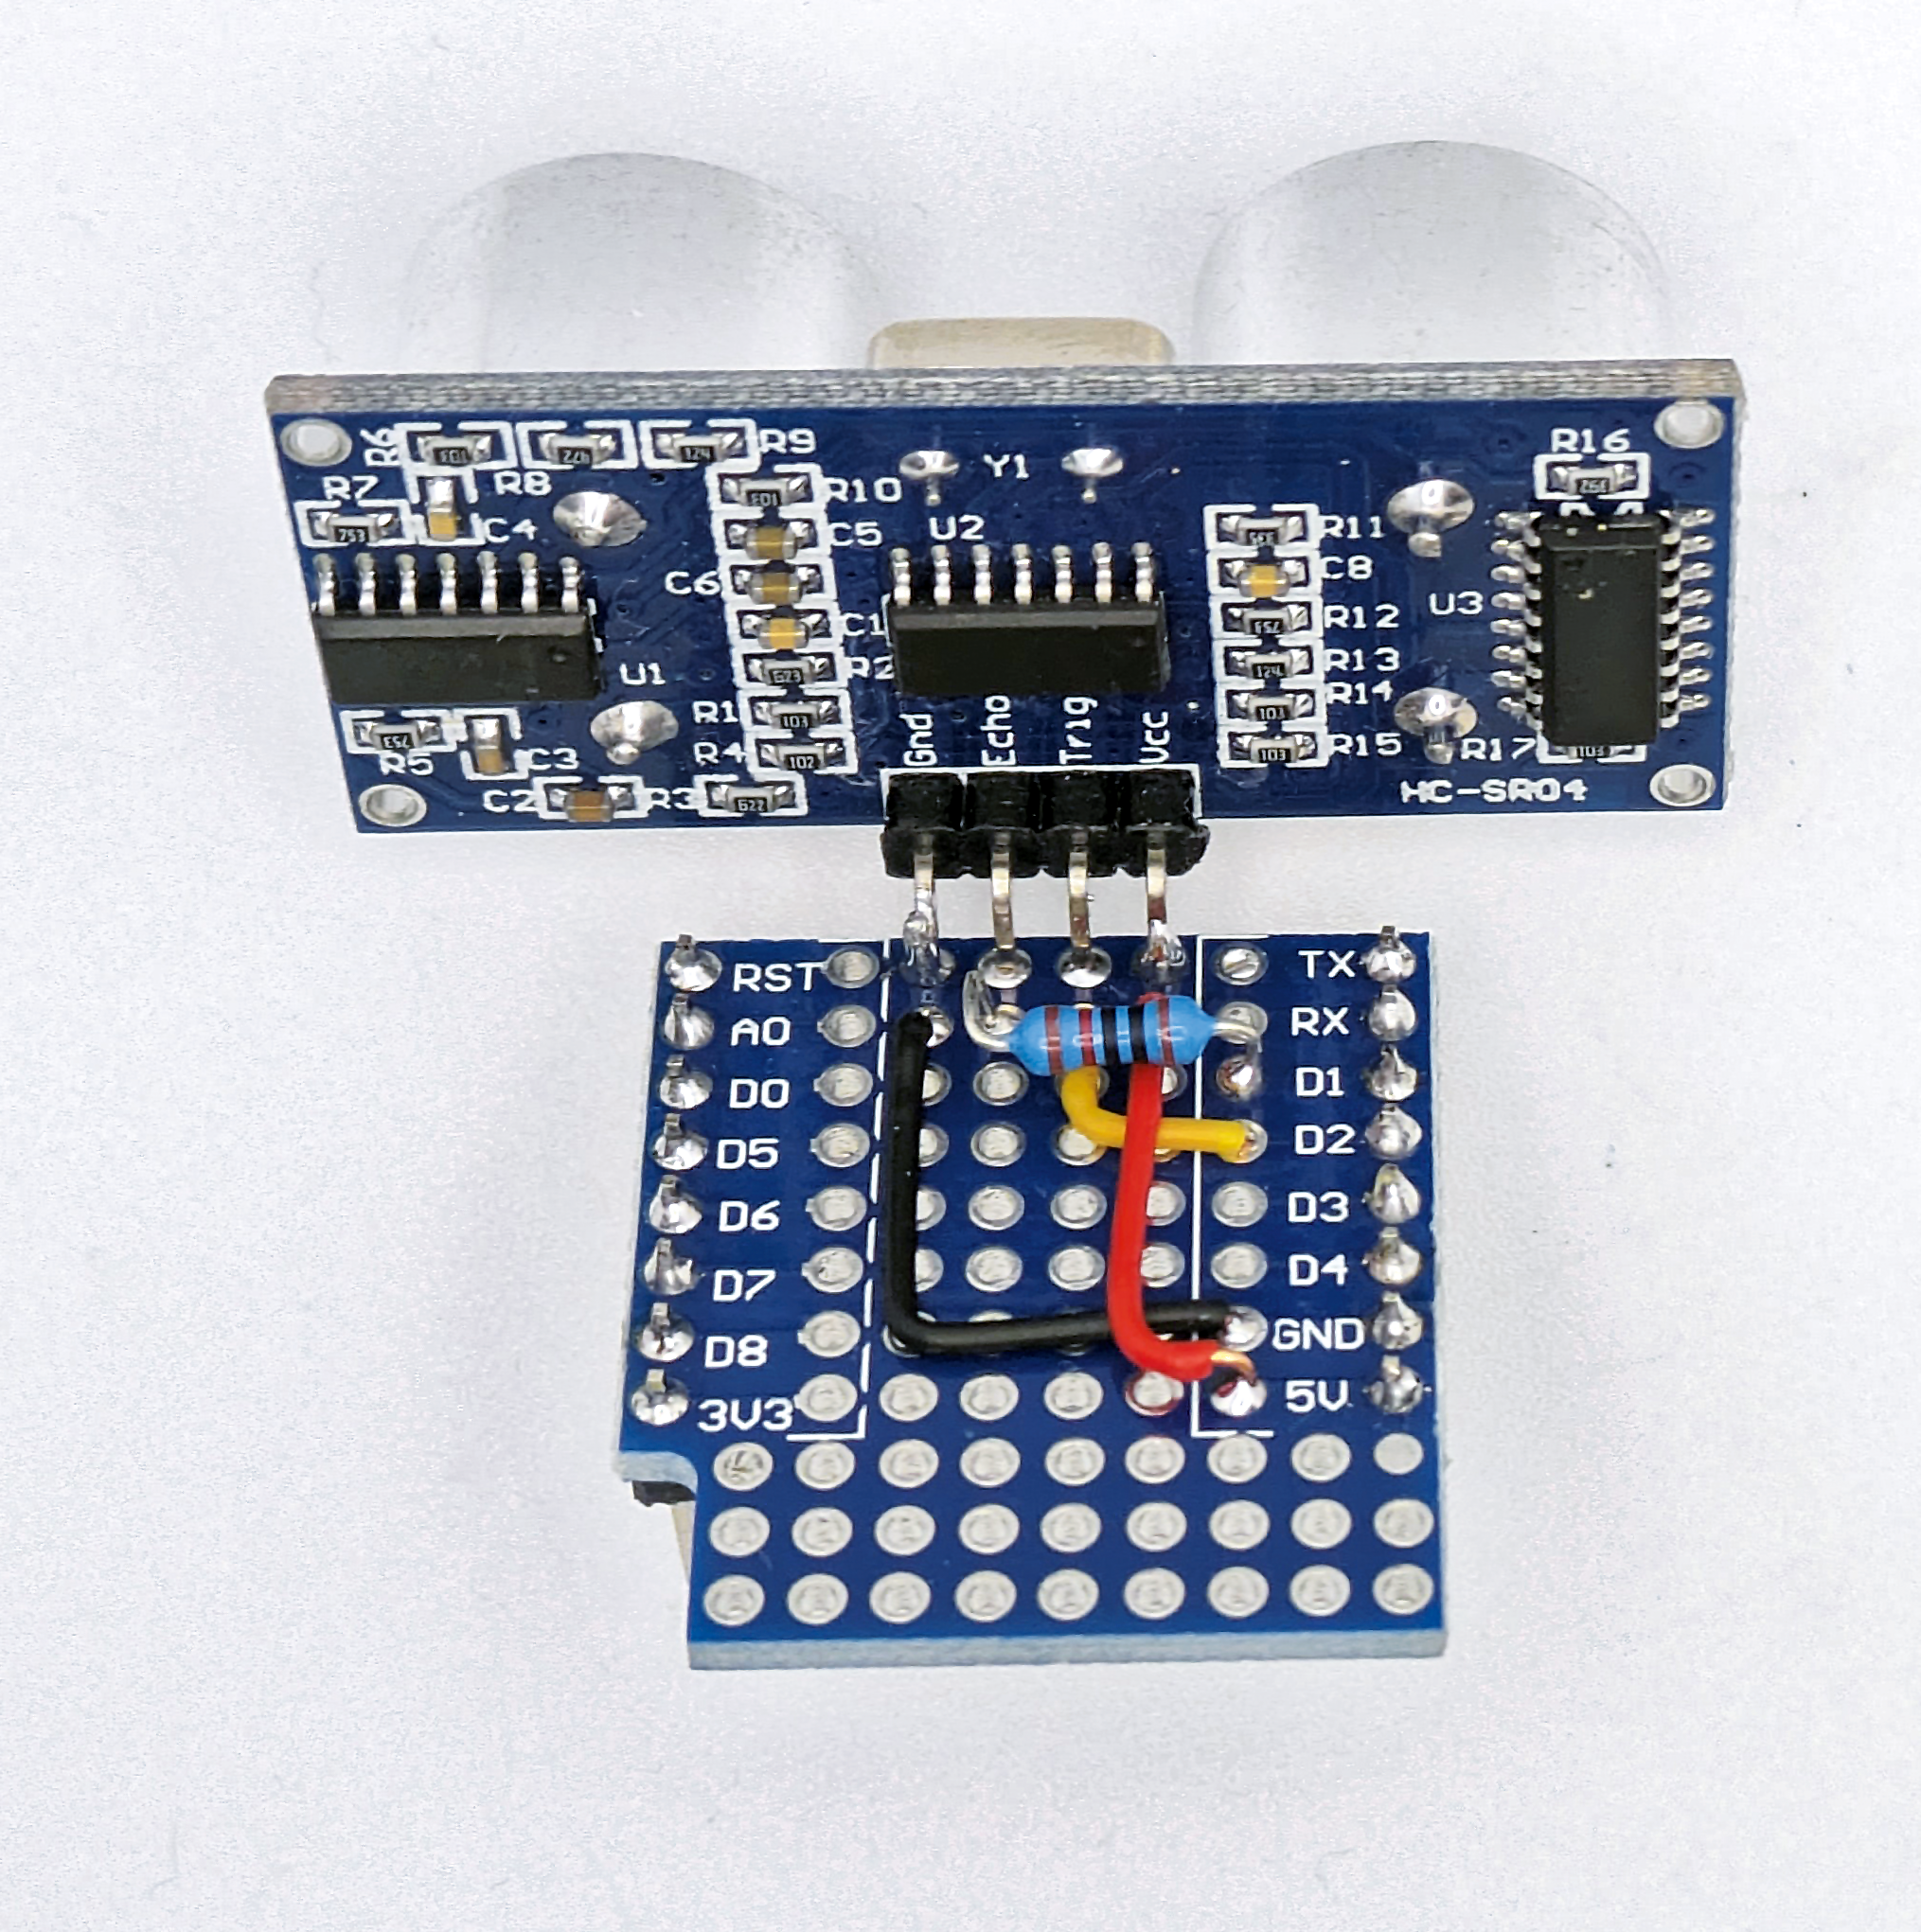
We assembled this project with a prototyping shield, although it is simple enough to be done on a breadboard or even directly soldered. See the photos for the layout we used; refer to the circuit diagram, Fig.2, to check your wiring. Remember the 10kΩ resistor for the ECHO pin.
We poked the wires through the shield to solder to the sensor pins on the underside. You may also need to attach header pins or sockets to the WiFi Mini or shield.
Power up the assembled Notifier and check that it works as before. You can use the ‘t’ command on the serial console to test the sensor; this will generate a report but not email it. Check that the sensor reports distances correctly; if so, then all is working.
Changing the doReport() and getStatus() functions is the easiest way to modify the contents of the emails that are sent. To send daily emails, move the doReport() function call down into the section that checks for the day changing, about seven lines lower.
If you are skilled with Arduino, you should have no trouble using our helper functions to create your own Notifier, produce custom reports and perhaps monitor other sensors.
You will have to work out the power and mounting options; a USB power supply and micro-USB cable should be sufficient for power delivery. Fig.1 should give you an idea of where to mount the unit.
This article appeared in the May 2024 issue of Silicon Chip Magazine. Check out their website for other project ideas: https://www.siliconchip.com.au/
Similar projects you may be interested in


